Configuration menu 3
Screen
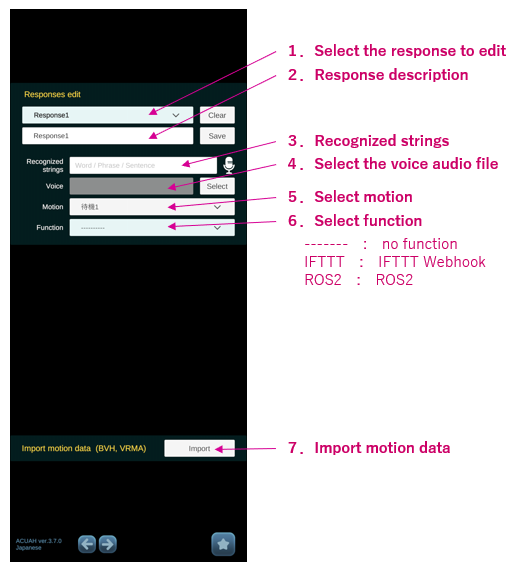
On this screen, you can customize (edit) the character's responses.
1. Select the response to edit
- Select the response you want to edit. You can create up to 20 responses, from Response1 to Response20.
2. Response description
- Enter a description of the response you have created (what action it performs). (For example, "Turn on the TV".)
3. Recognized strings
- Enter the voice that the character will use to respond (What you will say to the character).
- Press the microphone icon on the right and speak into it to see the recognized text.
- You can also edit this text, so if the voice recognition doesn't work, please enter the text manually.
4. Select the voice audio file
- This is the audio file that the character will use to respond.
- Select the audio file on your smartphone from the "select" button on the right.
- It supports wav, mp3, and ogg format.
If you send a file to your iPhone using AirDrop, it will be saved in the Download folder in iCloud Drive. When selecting the audio file above, you can specify a file on iCloud Drive directly, but they will be automatically copied to the /This iPhone/ACUAH/MediaCache folder. The same applies if you select a music file that is not in the /On My iPhone/ACUAH/MediaCache folder.
If you are concerned about the storage capacity of your iPhone, please save the audio files in the /On My iPhone/ACUAH/MediaCache folder directly.
5. Select motion
- Select a character motion from the drop-down list.
- If you have imported motions, you can select the imported data.
6. Select function
- Select a function to be performed when the character responds.
- For details on the settings for each function, please see the second half of the page.
7. Importing motion data
- You can import motion data in BVH or VRMA (VRMAnimation) format.
- Tap the "Import" button to display the file selection screen. Select the BVH or VRMA motion data that is saved on your smartphone.

- The format of the BVH or VRMA motion data is checked, and if there are no problems, the following message is displayed.
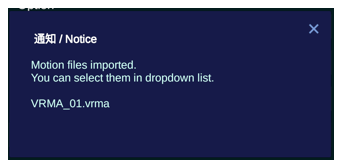
- The imported motion file can be selected in the motion selection of 5.Select motion.
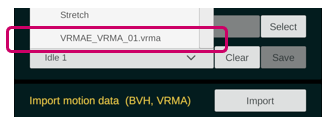
The letters "BVHE_" or "VRMAE_" will be automatically inserted at the beginning of the imported motion data file name.
■ Clear Settings / Save
-
Clear
- Initializes the values of the response settings you are editing.
-
Save
- Saves the response settings you are editing.
- When you save the settings, the text in 2. Response description will be reflected in 1. Response selection drop-down list.
IFTTT
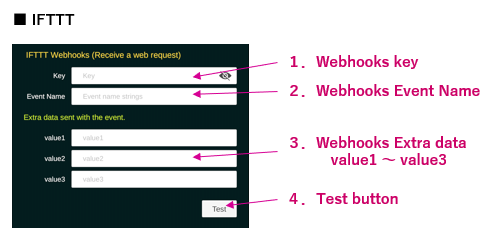
For an example of how to use SwitchBot, please refer to Supplemental explanation of main functions > IFTTT Webhooks linkage.
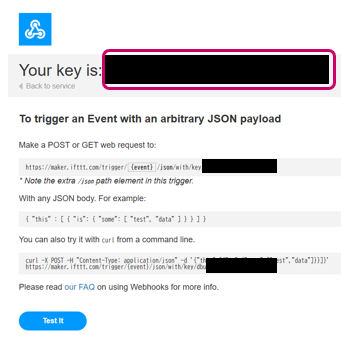
1. Webhooks key
- Copy and paste the string that follows "Your key is:" as confirmed on the IFTTT website and Webhooks Documentation.
- Tap the eye icon on the right to switch between showing and hiding the secret character string.
2. Webhooks Event Name
- Enter the Event Name you set up in IFTTT.
3. Webhooks Extra data value1~value3
- Set the Extra value1~value3 that you set up in IFTTT. (Set this if necessary, depending on the service you are linking with IFTTT).
4. Test button
- Fire the trigger and check that it works correctly.
It is not possible to confirm that the trigger sent from ACUAH to IFTTT Webhooks has arrived correctly. Please note that if the trigger is only sent to the specified URL of IFTTT Webhooks without any problems, a success message ("Congratulations!") will be displayed.
ROS2
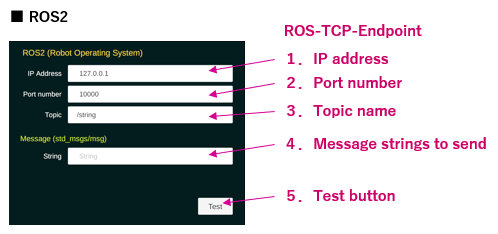
For details on how ROS2 works, please refer to Supplemental explanation of main functions > ROS2 linkage.
The ROS2 node that connects to ACUAH has been tested on a Raspberry Pi with the ROS-TCP-Endpoint from Unity Technologies installed.
1. IP address
- Enter the IP address of the ROS2 node that will communicate with ACUAH. Only IPv4 addresses are supported.
2. Port number
- Enter the port number of the ROS2 node that will communicate with ACUAH. The default is 10000.
You can set different IP addresses and port numbers for each response you edit.
In addition, if there is a response with ROS2 settings, the ROS2 message reception from the set IP address will be automatically enabled on the character display screen. For details, please refer to Supplemental explanation of main functions > ROS2 linkage.
3. Topic Name
- Edit the topic name when sending a message from ACUAH to ROS2. The default is "/strings".
- If there is no "/" at the beginning, it will be added automatically.
4. Message strings to send
- Enter the message string to be sent from ACUAH to ROS2 node.
- This is in std_msgs/msg/String format.
5. Test Button
- Establish a connection with the configured ROS2 node and send a message.