Voice settings
Screen
Tapping the "Voice Settings" button from the character model select and settings screen or login menu will take you to the Voice settings screen.
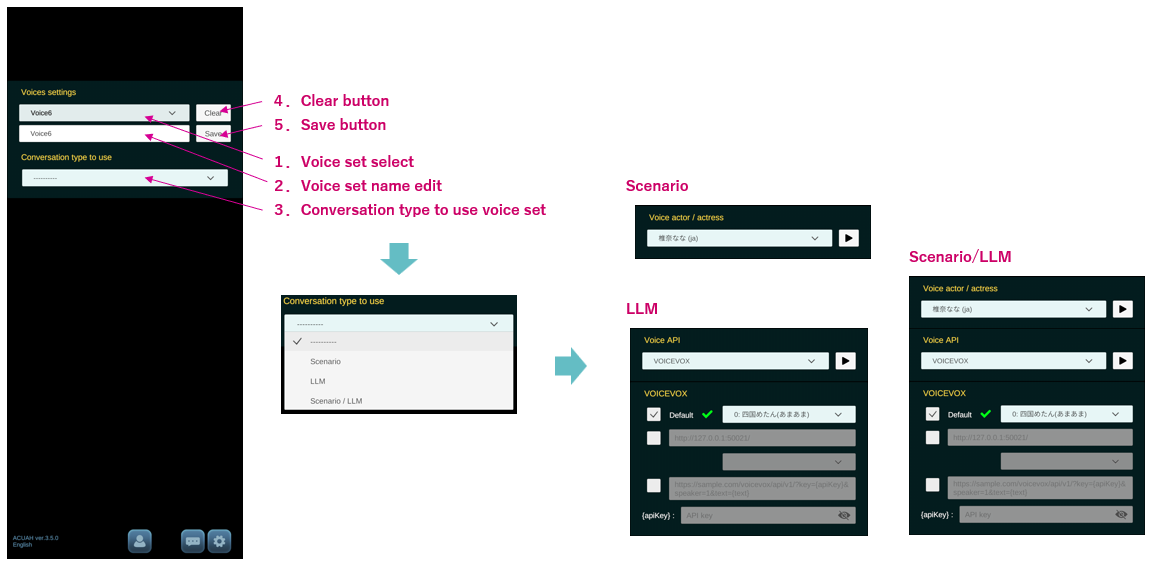
1. Voice set selection
- In the initial state, voice actor voice data for Scenario conversation type is set in Voice1~Voice3.
2. Edit voice set name
- You can set a name to the voice to be configured.
- Tap the 5.Save Settings button and the name will be reflected in the 1.Voice set selection drop-down.
3. Converstaion type to use selection
- Select the conversation types for voice data from Scenario, LLM, and Scenario/LLM.
- Once selected, the required settings will be displayed as shown on the right side of the image above.
4. Voice set clear.
- Tap the button to initialize the input contents of the voice set.
- If you wish to save the initialized settings, tap the 5.Save Settings button after clearing.
5. Save Settings button
- Tap the button to save the settings.
When you save the settings of VOICEVOX and Azure AI services TTS for the first time, the warning window on the right will appear. Please check the contents carefully. If you agree, the settings will be saved. If you are logged in with an ACUAH account, the consent status will be sent to the server managed by the application provider in connection with your ACUAH account. If you are not logged in with an ACUAH account, it will be stored on your device.
Scenario
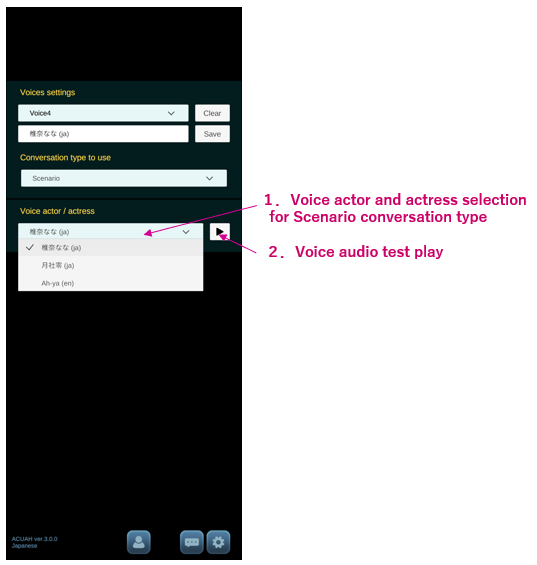
- If the conversation type is Scenario, please select the voice actor's or acress's voice data to be used.
- Tap the Test play button on the right to play the test voice.
LLM
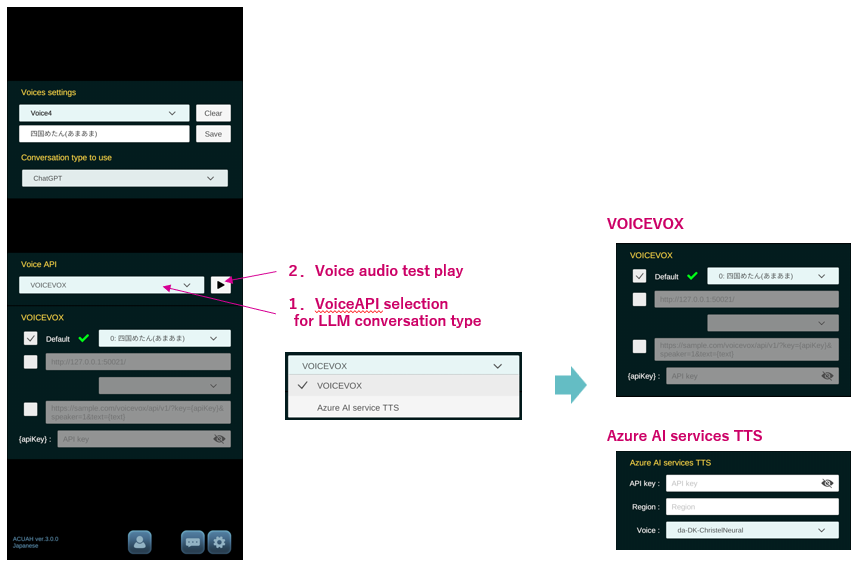
- If the conversation type is LLM, please select it as it uses VoiceAPI. Once selected, the respective setting item panel will appear.
- Select the Voice API to be used.
- VOICEVOX (Japanese only)
- Azure AI services TTS
- Tap the Test play button on the right to play the test voice. Please note that it may take some time to fetch the voice data.
- VOICEVOX
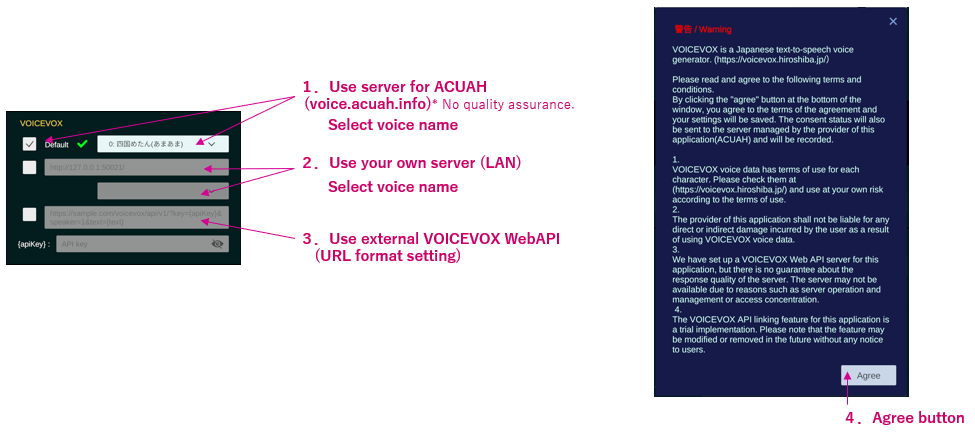
1. Use server for ACUAH
- VOICEVOX server for ACUAH is set up. It can be used for voice data generation. When checked, the server operation status will be checked and a list of voices (characters) will be retrieved, so please select a voice (character).
2. Use your own server (LAN)
- If you have a PC running as VOICEVOX engine in your own LAN environment, you can use the VOICEVOX server by specifying the IP, etc. When you input the URL, the server operation status will be checked and the list of voices (characters) will be retrieved, so please select the voice (character).
e.g. http://192.168.0.10:50021/
3. Use external VOICEVOX WebAPI
**3. External VOICEVOX server that requires an API key can be specified. In this field, enter the URL format referring to the example below.
- "{text}": The string of voice data to be generated is automatically entered.
- "{apikey}": The string entered in {apikey} will be automatically entered.
Example: https://sample.com/voicevox/api/v1/?text={text}&speaker=1&key={apikey}
If you use an external VOICEVOX Web server, please check the terms of use of that server carefully and use it at your own risk.
- Azure AI services TTS
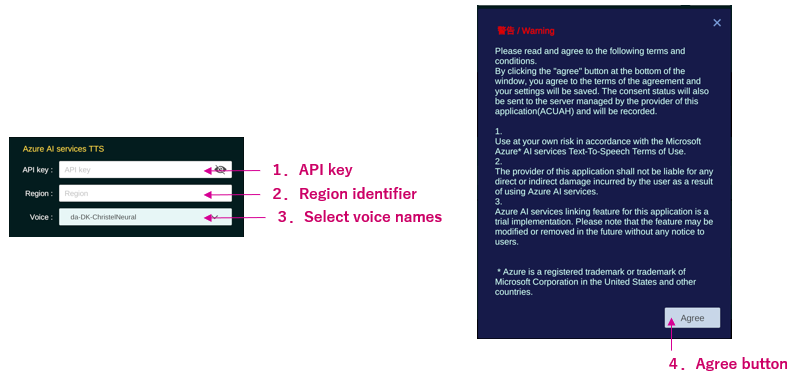
1. API key
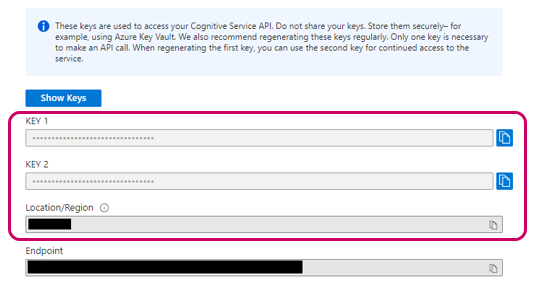
- Enter the Azure AI services Text-To-Speech API key that the user obtained by himself/herself by copy & paste, etc.
- Enter one of KEY 1 or KEY 2.
2. Region identifier
- Enter the string shown in Location/Region by copying and pasting or other means.
3. Select voice names
- Select the type of voice audio by referring to the following URL.
- https://learn.microsoft.com/en-us/azure/ai-services/speech-service/language-support?tabs=tts
For details on how to use and configure Microsoft Azure AI services voice service, please refer to the following
The required items for configuration can be found in the Microsoft Azure Portal.
Home > Azure AI services | Voice services > {Speech Service name created by you}}.
Scenario/LLM
- If the conversation type is Scenario/LLM, set both of the above.