ChatGPT settings
Screen

Tapping the "ChatGPT Settings" button from the character model select and settings screen or login menu will take you to the ChatGPT settings screen.
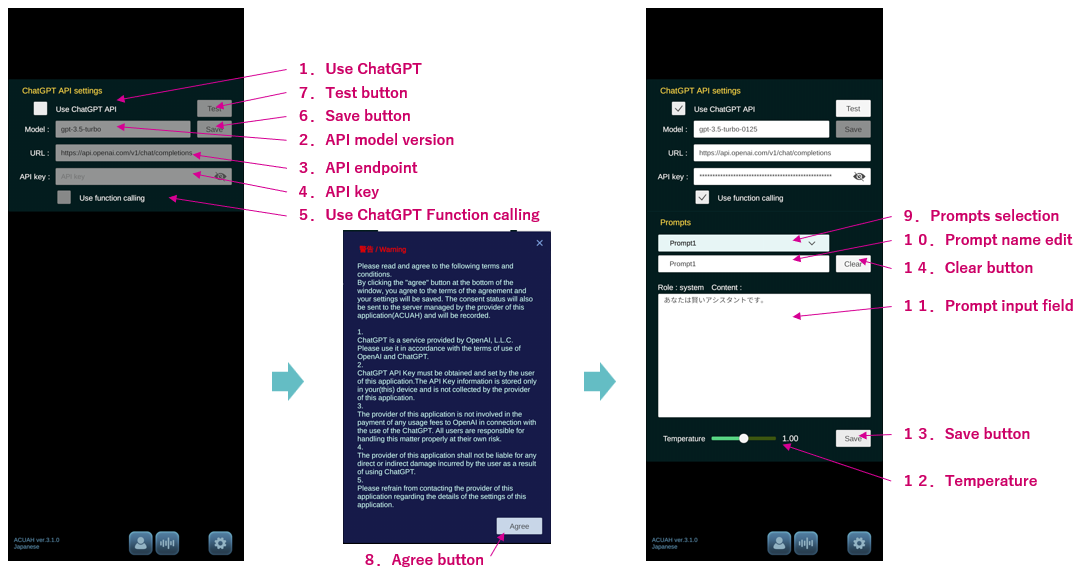
1. ChatGPT usage settings.
- Check the box if you want to use it. If checked, you will be able to edit 2.-5. below.
2. API Model version
- The default model version is entered, but you can change it according to the OpenAI release note.
The default model version is "gpt-4o-mini" as of 8/27/2024.
3. API Endpoint
- The endpoint (URL) is entered by default, but you can change it if necessary.
4. API Key
- Please enter the API key of ChatGPT that you have obtained by yourself by copy & paste.
- https://platform.openai.com/api-keys
5. Use ChatGPT Function calling
- Check the box if you want to use it.
- Please see the "About conversation type" page if you use the ChatGPT function calling.
-
When using ChatGPT Function calling, the ChatGPT usage fee (number of tokens) is more than for a normal conversation. Please check the usage OpenAI > Personal > Usage to check. Alternatively, you can say "ChatGPT usage" to the character to open the appropriate page.
-
Also, the version of ChatGPT model that can be used for function calling is fixed, so please change it if necessary. https://platform.openai.com/docs/guides/function-calling
6. Save settings
- Tap button to save the settings.
If you try to save a setting that uses ChatGPT, the warning window on the right will appear. Please check the contents carefully. If you agree, the setting will be saved. If you are logged in with an ACUAH account, your consent status will be sent to the server managed by the application provider. If you are not logged in with an ACUAH account, it will be stored on your device.
Also, when using ChatGPT, please be sure to configure Voice API settings.
7. Test button
- You can actually communicate with ChatGPT to check if the settings related to ChatGPT API are correct.
When testing, the prompts set in Prompt1 is used.
9. Select prompts
- Select the prompt for setting from Prompt1 to Prompt10.
10. Edit prompt name
- You can set a name to the prompt you have set. 13."Save Settings" button and it will be reflected in the prompt selection in 9.
11. Prompt input
- Please enter your prompt on this field.
- The default prompt is "You are a helpful assistant."
If the prompt is long, it is recommended to create by a other text editor application separate prompt using a text editing application and copy and paste it into this field.
12. Temperature
- You can change the value of the Temperature parameter. (You can change the value of the Temperature parameter (from 0.00 to 2.00), default is 1.00.
- The value of the Temperature parameter can also be set on a prompt-by-prompt basis.
13. Save Settings button
- Tap the button to save your settings.
14. Clear Input
- Tap the button to initialize the prompt.
- If you wish to save the initialized settings, tap the 12. Save Settings button after clearing.